


1. 确认cuda、cudnn版本
首先确认版本,确保tensorflow-gpu、pytorch、cuda、cudnn四个版本版本均能对应。我这里是基于tensorflow-gpu的版本来找对应的pytorch版本
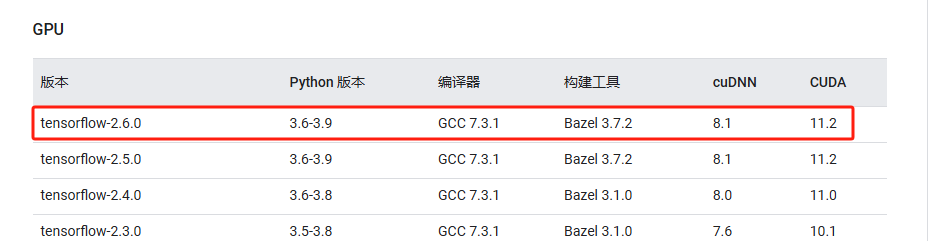
(1)查看tensorflow-cuda版本:https://tensorflow.google.cn/install/source?hl=zh-cn#tested_build_configurations
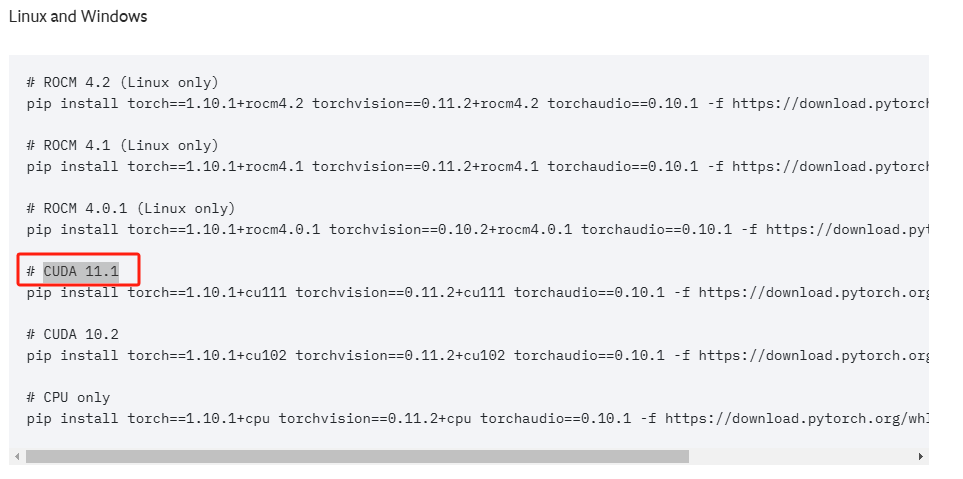
(2)查看pytorch-cuda版本:https://pytorch.org/get-started/previous-versions/
这里会发现官网上没有CUDA 11.2对应的版本,由于CUDA可以向下兼容,装CUDA 11.1对应的版本即可。
2.部署容器环境
2.1 获取nvidia官方源
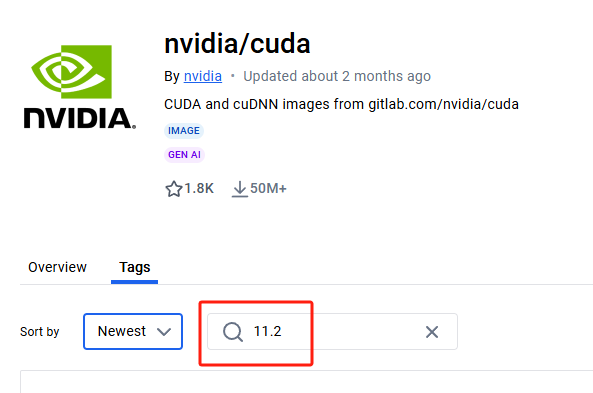
在这里获取nvidia官方提供的cuda镜像:https://hub.docker.com/r/nvidia/cuda/tags
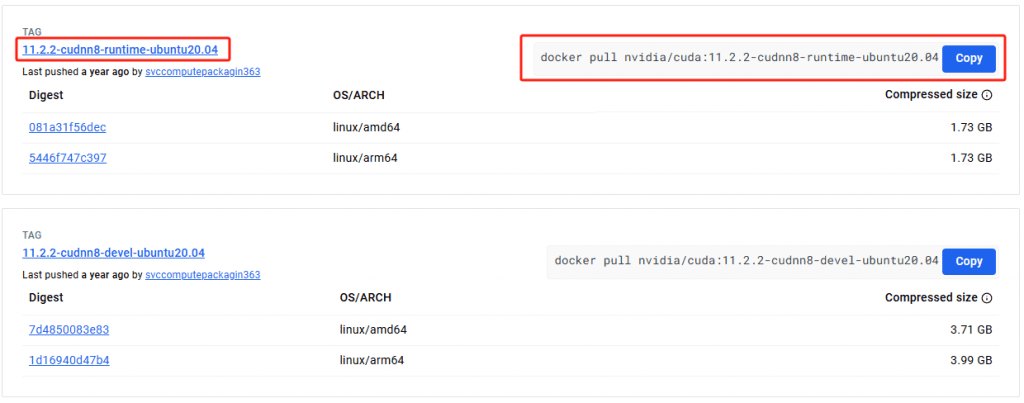
这里直接用带cudnn的镜像,这个两个镜像用哪个理论上都可以,区别如下:
- devel:涵盖了开发所需的所有工具,包含编译、debUG等,以及编译需要的头文件、静态库.
- runtime:涵盖了运行环境的最小集合,例如动态库等
2.2 创建容器
(1)如果ubuntu系统不能科学上网,需要手动换国内docker源,不会操作的直接用下面的源:
docker pull crpi-29nfzz0svq4skgtw.cn-hangzhou.personal.cr.aliyuncs.com/lznamespace/cuda:11.2.2-cudnn8-devel-ubuntu20.04为了方便使用可以tag成新镜像:docker tag old_image:old_tag new_image:new_tag
(2)创建容器,这里镜像是我tag后的名字
docker run --gpus all -p 10240:22 -it --name ai cuda:11.2.2 /bin/bash按ctrl+p+q 让容器在后台运行
2.3 安装系统基础环境
(1)首先更换apt源
容器内没有编辑器,在宿主系统编辑好source.list文件复制到容器内
docker cp sources.list ai:/etc/apt/>> sources.list文件内容 <<
# deb cdrom:[Ubuntu 20.04.2.0 LTS _Focal Fossa_ - Release amd64 (20210209.1)]/ focal main restricted
# See http://help.ubuntu.com/community/UpgradeNotes for how to upgrade to
# newer versions of the distribution.
deb http://cn.archive.ubuntu.com/ubuntu/ focal main restricted
# deb-src http://cn.archive.ubuntu.com/ubuntu/ focal main restricted
## Major bug fix updates produced after the final release of the
## distribution.
deb http://cn.archive.ubuntu.com/ubuntu/ focal-updates main restricted
# deb-src http://cn.archive.ubuntu.com/ubuntu/ focal-updates main restricted
## N.B. software from this repository is ENTIRELY UNSUPPORTED by the Ubuntu
## team. Also, please note that software in universe WILL NOT receive any
## review or updates from the Ubuntu security team.
deb http://cn.archive.ubuntu.com/ubuntu/ focal universe
# deb-src http://cn.archive.ubuntu.com/ubuntu/ focal universe
deb http://cn.archive.ubuntu.com/ubuntu/ focal-updates universe
# deb-src http://cn.archive.ubuntu.com/ubuntu/ focal-updates universe
## N.B. software from this repository is ENTIRELY UNSUPPORTED by the Ubuntu
## team, and may not be under a free licence. Please satisfy yourself as to
## your rights to use the software. Also, please note that software in
## multiverse WILL NOT receive any review or updates from the Ubuntu
## security team.
deb http://cn.archive.ubuntu.com/ubuntu/ focal multiverse
# deb-src http://cn.archive.ubuntu.com/ubuntu/ focal multiverse
deb http://cn.archive.ubuntu.com/ubuntu/ focal-updates multiverse
# deb-src http://cn.archive.ubuntu.com/ubuntu/ focal-updates multiverse
## N.B. software from this repository may not have been tested as
## extensively as that contained in the main release, although it includes
## newer versions of some applications which may provide useful features.
## Also, please note that software in backports WILL NOT receive any review
## or updates from the Ubuntu security team.
deb http://cn.archive.ubuntu.com/ubuntu/ focal-backports main restricted universe multiverse
# deb-src http://cn.archive.ubuntu.com/ubuntu/ focal-backports main restricted universe multiverse
(2)安装vim、ssh
apt install vim
apt install openssh-server
systemctl start ssh
systemctl enable ssh
3. 安装anaconda
首先进入容器:docker exec -it ai /bin/bash
(1)先安装以下扩展依赖项
apt-get install libgl1-mesa-glx libegl1-mesa libxrandr2 libxrandr2 libxss1 libxcursor1 libxcomposite1 libasound2 libxi6 libxtst6(2)获取anaconda安装文件
curl -O https://repo.anaconda.com/archive/Anaconda3-2024.10-1-Linux-x86_64.sh(3)安装anaconda
- 执行文件安装文件
bash Anaconda3-2024.10-1-Linux-x86_64.sh
- 按回车键查看许可协议。然后按住回车键滚动。
- 输入
yes以同意许可协议。 - 按回车键接受默认安装位置 ( PREFIX=/Users/<USER>/anaconda3),或输入其他文件路径以指定备用安装目录。安装可能需要几分钟才能完成。
- 选择初始化选项:
yes-conda修改您的 shell 配置以在您打开新 shell 时初始化 conda 并自动识别 conda 命令。no-conda不会修改您的 shell 脚本。安装后,如果您要初始化,则必须手动进行初始化。
- 安装程序完成并显示“Thank you for installing Anaconda3!”
- 关闭并重新打开终端窗口以使安装完全生效,或者使用以下命令刷新终端
source ~/.bashrc
(4)配置conda基础环境
python版本要满足tf和torch的版本要求
conda create --name ai python=3.7
conda activate ai
4.安装tensorflow&pytorch
(1)安装tensorflow-gpu
这里直接使用清华源安装,如果想换默认源,可以参考清华大学开源软件镜像站
pip install tensorflow-gpu==2.6.0 -i https://mirrors.tuna.tsinghua.edu.cn/pypi/web/simple(2)安装pytorch
可以使用第一步中查询到的地址下载
pip install torch==1.10.1+cu111 torchvision==0.11.2+cu111 torchaudio==0.10.1 -f https://download.pytorch.org/whl/cu111/torch_stable.html官方地址速度很慢,也可以在科学上网的环境下载3个到本地再上传到docker容器内用pip安装whl文件。
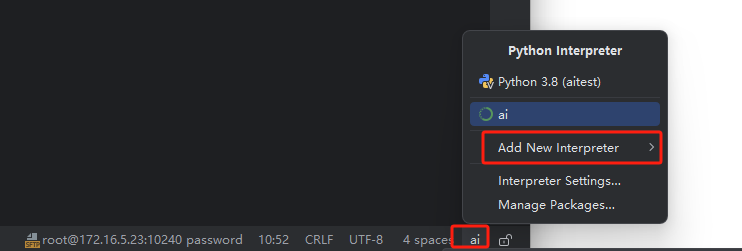
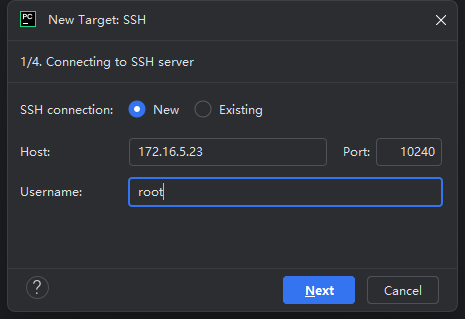
5.配置pycharm连接容器环境
这里以pycharm2024.3版本为例,首先创建项目,在右下角添加解释器,选择on ssh方式,根据向导添加conda配置的ai环境即可

Comments | NOTHING